Tuned Port Cavalier Buildup
I will add the latest updates to the bottom of
this page, check here
About the conversion: this is without doubt the
hardest to do of any car I've built, and I built the full street/race tube-chassis
in my '57 which I drive on the street, and helped my brother put a full
tube street/race chassis in his '86 Z-24 Hatchback Cavalier, among quite
a few other cars for friends. I guess one thing I'm trying to stress here
is that we have a very well equipped garage (mig, torch, tubing bender,
lathe, drill press, I think every air tool imaginable, plus both of us
are machinists and have full access to all the tools at work) On everything
I tell you about my Z-24 conversion I'll try to give you an idea of how
you might be able to do it if you ever want to tackle a project like this
but don't have access to the tools I have (it might cost a little more,
though, than the way I did mine, but it can still be done) The thing that
makes this (Z-24 conversion) harder is because I'm keeping all the creature
comforts, switching the air conditioning over to 134-A, and not putting
any holes in the hood or roll bars in the interior or anything else to
give up the fact that this is not your basic FWD car. Okay here goes:
Making it fit: After
disassembling the car, selling the original V-6 (which was a bad little
motor to begin with) I had to remove the AC box and cut the trans hole,
then move the outlets on the AC evaporator to clear the trans and weld
new (134-A) fittings on; the heater core had to be turned 90 degrees and
the outlets now come out of the side of the Heat/Air box above the drivers
feet and go through the firewall by the steering column. (the new heater
outlets I machined out of aluminum and had to glue onto the original plastic
tanks of the heater core with a special glue I got from Graingers) An easy
way to get around the Heat/Air deal would be to take the old box out and
go with a street rod Air/Heat unit (Vintage Air is the leader in that market,
but I have books from all the A/C companies for ideas and options); they
have some nice units from $500 or so for the basic system to around $1000
for the killer digitally controlled temp unit that will easily fit in the
space under the dash.
Steering; Front Frame: The
steering rack is on the firewall and has to be moved to in front of the
strut and below the oil pan on the motor, and you have to change to a rack
out of a front steer car (mine is a power rack out of a Mustang, again
common among street rods) . This front frame deal is the hardest to explain,
I have a bunch of parts that I engineered and machined the parts myself
to do this. The rack is right up against the oil pan on the motor, and
I had to notch and modify the oil pan to get it high enough so my struts
didn't have bump steer. I used the factory frame rails that the A-arms
attach to and ran 1 5/8 -.135 wall (roll cage) tubing between them and
then up to the uni-body frame, then triangulated back down to the middle
of the cross bar that I first put in; with just enough clearance for the
oil pan, tying it all together. With the 350 sitting in the car the cross
tubes are inline with the side motor mounts, and this is what the motor
is mounted on. This is a little hard to explain, I hope most of you are
still following. Next, the sway bar has to be moved, I took it out and
found out that I could just turn it around backwards and it now is mounted
on the bars that I put in to mount the motor (that I just explained about).
I had to make new mounts on the front of the A-arm for the sway bar to
attach to, and also boxed the A-arms on both sides while I was at it.
Fitting the front wheels: This
is the part that was the most challenging so far, the front spindle. If
I had kept the stock rims or went with rims made for a Z-24 it wouldn't
have been as big a deal, but I wanted to go to 16" rims and saw these OZ
- 5 spoke "Monte Carlo" rims and just had to put them on it so I ended
up getting some with a close enough back spacing to still look like a FWD
car. I could only get a 4.5" bolt circle in the sizes/offsets I wanted,
the front ones are 16 x 7.5 and made for a Shelby Charger, and the back
ones are 16 x 8 and made for a Mustang. The front spacing on both look
identical and I should be able to get a spare for the Stang or the Charger
to work as my spare tire. I was originally just going to redrill the bolt
circle on my front spindles, but I knocked the studs out and kind of bolted
the rim to the stock spindle to see what it was going to look like with
the car sitting on the ground and it stuck out of the fender well about
3/8 of an inch, which was unacceptable to me. So I took off the struts
and designed and machined a new spindle for it that moved the wheel in
5/8 of an inch. It now sits in the fender well just like the factory wheels
did, and while I was making the new spindles I also fit on a set of Wilwood
11 3/4" discs, and mounted the stock calipers on them. The new steering
arm is also mounted on the new spindle that I made, and it has to be in
just the right place to clear the wheel's backspacing when it steers. An
easier way to do this for others might be to look at a newer Camaro front
strut or some other cars in the salvage yards or even maybe some street
rod front suspensions and see if they might work. I would prefer struts
on a car like this because it's pretty limited on space, but A-arms when
set up with the right angles will handle better in the corners. (I feel
struts handle better in higher speed situations, though, 100 plus mph)
Motivation, the motor and trans: As
you probably know it's a 350 with a tuned port EFI intake hooked to a '93
Vette 4L60-E. A carb will not fit under the hood. I was worried that I
couldn't get a tuned port under the hood and was going to have to go with
a TPIS "big mouth" (aftermarket) EFI intake to get everything to fit (it's
about 3" shorter in height), which would have been better from a performance
standpoint since it's a direct replacement for a tuned port and it will
make 80 more HP just bolting it on. But I didn't want to spend the $800
bucks for it right now (plus another $300 for the fuel rail) And I kind
of like the looks of a tuned port, anyway, I'm building this car more of
as a cruiser (street rod style) than a flat out "as fast as it can possibly
be" car. For the wiring harness I took the stock Cavalier V-6 harness,
and modified it for the Tuned Port (GM's got the same computer running
the '86 and up V-6 as '90 thru '92 Tuned Port V-8's have), but it wasn't
as easy as it seemed to rewire, I had to buy almost all the sensor wire
connectors because they changed the plug-ins on almost everything on the
V-6 harness, I think next time I will just get the street rod (Painless
Wiring) harness and just add the vehicle speed sensor to it (it comes without
the VSS connection).
Trans Tunnel: The transmission
tunnel was made out of .050 steel and (first of all there's a part of the
frame that I built out of the 1 5/8" tubing running down each side of the
trans with a tubing cross member that's also the rear trans mount) The tunnel
was made by taking poster board 6 to 8" wide and making a pattern for each
piece of steel and forming the steel after it was cut, then welding it
in and going on to the next piece. The drive shaft tunnel was made in a
similar fashion although I did it with 1 piece of steel, and bent the edges
of the "box" over some roll cage tubing so it looked more factory.
Frame and rear end: the frame
has two tubes going down the outside of the floor pan that I bent up so
it would follow the contours along the edge of the floor pan, then they
bend up and in where the stock gas tank used to be under the rear seat
and connect with one of the stock attachment points for the stock rear
suspension, and on up for to the place where the upper 4 link bars are
going to be connected. The cross bar that I talked about a bit ago for
the trans mount goes out to the edge and connects with these outer bars
and the bars going down each side of the trans. from the trans cross bar
back there's a pair of tubes that follow the trans tunnel lower corner
that go back to the area under the rear seat, and then there's a sort of
maze of tubes in the old gas tank area to brace the 4-link attachment points.
After the tubes go over the rear axle they just go straight back to the
rear bumper, and I now have a 16 gallon fuel cell behind the 9" Ford axle.
I machined a filler neck for the cell so I could run the filler hose over
to the stock side fuel door, and took the top filler ring out and simply
welded the stock Cavalier electric fuel pump sending unit and float into
the filler ring, I got a fuel pump from the local auto parts store that
will handle the tuned port, and it just fit right on the Z-24 sending unit.
For the 4-link I have the two bottom bars going straight forward and the
lower bars attach directly in the old rear suspension mounting point, but
the width was different so I fabricated a new plate for 1 side of the mount
and tied both mounts to the rear portion of the tube frame that I ran back.
the upper bars are angled from the center of the jug of the 9" Ford axle
and it looks much like a Chevelle suspension. I used 1 3/8" - .134 wall
tubing for the 4-link bars with street rod urethane bushings in the ends.
I have 200 pound coil springs in the back and all the mounts for the rear
were fabricated by me. The exhaust was done by a friend of mine who owns
a muffler shop (I guess I can't do everything) and I left enough room in
the old gas tank location under the rear seat to put the longest set of
Walker Dynomax mufflers that I could get under there. I tried to leave
enough room when I build the rear suspension to run the exhaust over the
axle and back over to the side where the stock tips were, and when he put
the exhaust on it was tight, but I was happy that he could do it exactly
the way I wanted it to be done and it turned out great. Now the exhaust
comes out the back through the same 2 1/4" tips in the lower spoiler notch
that the V-6 did, making it look even more FWD-erish.
(11/21/97) Right now I'm in the process of putting
the rear inner fenders back in (had to slit them down the middle to fit
the wider tires in, the plastic interior panel looks like it will still
fit over the widened fenders without much modification.
(11/24/97) Got the fuel lines ran, measuring the power
steering ports so I can get the special (metric) tube-o-ring fittings ordered,
looks like I might be able to fire it up shortly, but I still have to take
the motor back out to finish some things and clean and paint the engine
compartment before it's done.
(11/30/97) The power steering lines are ran, fuel lines
are hooked up to the manifold, I was wanting to turn on the fuel pump today
to set the fuel pressure and see if it worked, but ran out of time. I decided
to go ahead and port the center top part of the TPI like they showed in
High Tech Performance magazine before I fire it up so I've got it off doing
that now. I started to run the brake lines yesterday, but the lines I have
running from the wheel calipers hit the wheel because it has so much backspacing
(found that out after I mounted the brake line tab on the frame) so I'll
have to look for a different line with a sharp 90 degree bend at the caliper
end, shouldn't be to hard to find.
(12/1/97) The top center part of the Tuned Port manifold
is ported and I've got it all together ready to fire, anyone who has a
TPI might look into this, the GM High Tech Performance mag says it increases flow with the
stock throttle blades from 576 CFM to 688 CFM, and was worth .45 seconds
in the quarter on their test car, and it only took me about 30 minutes
to port mine. The issue the article was in was the November 1997 issue,
and you can get to the magazine by clicking on the below link to get the
back issue.
After I got the intake all together I got some gas and checked
the fuel pump to see if it worked. It wouldn't even run! I kinda bumped
the top of the fuel cell to see if it was stuck or something and it ran
for a short while, then stuck again. I was trying to decide if my new pump
was defective or something, then it hit me, I wonder if the small ground
wire running to the pump with the factory harness is large enough to run
the pump now, because it's now mounted in a plastic fuel cell instead of
a steel fuel tank. I jumpered a larger wire to the center part that the
pump is mounted on and it works fine now, so I'll put a permanent large
ground wire on it tomorrow. I had to do a lot of parts running today, so
that's all I got accomplished. Here's the link for the above mentioned
mag. High-Tech Performance
Magazine
(12/2/97) Got it running - Worked all day filling the
motor and trans with oil, priming the oil pump and putting 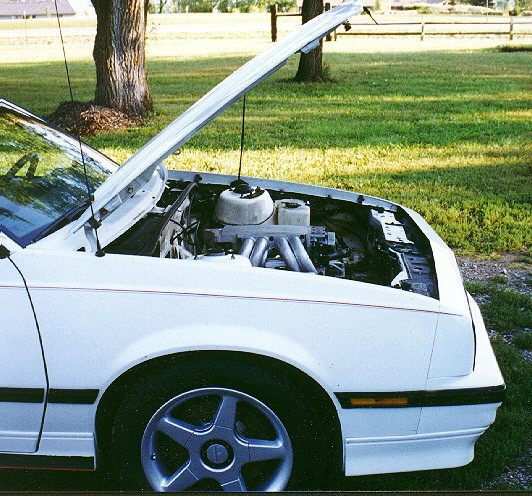 the
distributor in, rough setting the fuel pressure so it was enough to fire,
then I set it again after I got it running, taking the headers off and
clearancing them for one of the plugs and putting them back on, pulling
the exhaust down and welding it where they couldn't reach when they bent
it up. It idles fine once I got it set, but the motor got a little warm,
I hope it's just because the air all hasn't gotten purged out of the water
passages yet, but I'm thinking that maybe the small aftermarket fans that
I've got just aren't flowing enough air. I wanted to use the factory radiator
fan because I haven't seen an aftermarket fan that would keep up with the
factory unit, but space was pretty tight. If it doesn't start cooling I
guess I'll have to make space. Other than that it has a little problem
starting in that it won't start without a little throttle, and a EFI car
should start with no throttle, I'll have to do some looking into that,
but the guy I got it from had it on a Firebird Firehawk factory road race
car and he said they had a chip made that put more fuel into it going into
the corners, I'm sure I'll have to get a chip made for this motor. I'll
probably take a few days rest from this, gotta go back to work tomorrow.
(been off on vacation since the 27th)
the
distributor in, rough setting the fuel pressure so it was enough to fire,
then I set it again after I got it running, taking the headers off and
clearancing them for one of the plugs and putting them back on, pulling
the exhaust down and welding it where they couldn't reach when they bent
it up. It idles fine once I got it set, but the motor got a little warm,
I hope it's just because the air all hasn't gotten purged out of the water
passages yet, but I'm thinking that maybe the small aftermarket fans that
I've got just aren't flowing enough air. I wanted to use the factory radiator
fan because I haven't seen an aftermarket fan that would keep up with the
factory unit, but space was pretty tight. If it doesn't start cooling I
guess I'll have to make space. Other than that it has a little problem
starting in that it won't start without a little throttle, and a EFI car
should start with no throttle, I'll have to do some looking into that,
but the guy I got it from had it on a Firebird Firehawk factory road race
car and he said they had a chip made that put more fuel into it going into
the corners, I'm sure I'll have to get a chip made for this motor. I'll
probably take a few days rest from this, gotta go back to work tomorrow.
(been off on vacation since the 27th)
(12/11/97) Due to a few E-mail requests, I've gotten
a few pictures of the motor compartment scanned in, they're some older
shots I took right after I dropped it in, and the motor compartment is
still a bit bare. I don't have a scanner yet, so a friend did them for
me, you'll have to bear with me and I'll try to get some more current ones
put in, along with some frame and suspension shots.
(12/13/97) I worked on the brake lines today a bit,
got the front ones almost all ran. I also did a little bit of work on the
motor, adjusting the valves, fixing a small leak in the bottom radiator
hose, ect. . The problem that I wrote about with the car not wanting to
start without part throttle seemed to iron itself out, it starts fine now
with no throttle at all. The block learn memory is staying a little closer
to 128 now on the scanner, I guess it just had to learn the motor's requirements
was all. I still need to get a chip made, though, the electric fans don't
kick on till the motor is over 205 degrees, I think that's some of the
problems with it getting hot, although it's doing a lot better on that,
too.
(12/28/97) Been busy with other things
and haven't gotten this updated for awhile, I hope some of you noticed
my page changing buttons on the main pages - I know, big deal, but it took
me 2 days to make them. I've now got a Microtek Scanmaker E-6 scanner
(Made my buttons with the scanner and it's software). I should be
getting a few more pictures put on;  I
guess I'll start with a rear suspension shot.
I
guess I'll start with a rear suspension shot.
This shot was taken through the rear hatch with it
open and shows the upper 4-link bars, lower bars, shocks installed, fuel
cell, and springs. It was taken before I put back in the inner fenderwells,
and I still haven't got the floor panel replaced yet. I should be pulling
out the rear housing this week; blasting and painting it and the frame
and assembling it all for the final time.
I started to run the brake lines back to the
rear today, I mounted my adjustable proportioning valve for the rear line
and finished up with the front lines. Had to do a lot of parts running
because it seemed like everyone around Topeka was out of 3/16 inverted
flare nuts, finally found them at Napa, but then he sold me the wrong gasket
for a 9" so I had to go back and get the right one. One of those days -
 (1/2/98)
Finished all the lines to the rear, just have to run the short pieces on
the rear itself to the brake calipers, I figured it would be easier to
wait until I get the rear out to run those. I built the brackets for the
bump stops on the rear so it won't bottom out and then dropped the rear
out of the car to do the cleanup.
(1/2/98)
Finished all the lines to the rear, just have to run the short pieces on
the rear itself to the brake calipers, I figured it would be easier to
wait until I get the rear out to run those. I built the brackets for the
bump stops on the rear so it won't bottom out and then dropped the rear
out of the car to do the cleanup.
(1/12/98) Still working on the rear end. I have to
blast outside and it's only around 25 degrees right now, and I'm having
lots of problems with the blaster icing up. Looks like it might start to
warm up Thursday or Friday so I might have to wait until then to blast.
I've got a few more pictures of the motor the way it is now and the underside
of the car so I'll put them on now.  I've
numbered the underside picture so I can point out a few areas. Above #1
is the lower 4 link front mount which utilizes 1 side of the factory rear
mount, and the other side is hooked to the roll cage tubing that I made
the frame out of. Although you can't see #2 very well, right above it is
the spindle that I machined. Item #3 shows the transmission cross member that curves down under the mount and extends from one side of the frame
to the other. The last number #4 is on the driveshaft, but to the left
of it is the bar that goes out to the lower 4 link mounts on both sides
to strengthen them. Both the bars that curve down beside the driveshaft
go forward to join the trans cross member above #3 on both sides of the
tunnel.
I've
numbered the underside picture so I can point out a few areas. Above #1
is the lower 4 link front mount which utilizes 1 side of the factory rear
mount, and the other side is hooked to the roll cage tubing that I made
the frame out of. Although you can't see #2 very well, right above it is
the spindle that I machined. Item #3 shows the transmission cross member that curves down under the mount and extends from one side of the frame
to the other. The last number #4 is on the driveshaft, but to the left
of it is the bar that goes out to the lower 4 link mounts on both sides
to strengthen them. Both the bars that curve down beside the driveshaft
go forward to join the trans cross member above #3 on both sides of the
tunnel.
(1/18/98) Got the rear end blasted, painted, re-assembled,
and installed back in the car. I also got the brakes bled, and I'm trying
to think of everything I need to do before I can take it for a test spin.
I started it up tonight after I got done bleeding the brakes and spun the
rear end up to 75 mph on the stands to see if anything vibrated or did
anything it shouldn't be doing and it seemed okay. Shouldn't be to much
longer before the maiden voyage now!
(1/25/98) Took it out for a little test run today -
I wasn't quite satisfied with the way the brakes are working yet, I'll
need to spend a little more time there. The rear springs seem a little
heavy, also, so I'll get some lighter ones and try them. I also remembered
that I still haven't got the right speedometer gear yet, and I can't remember
if I got the TCC cable hooked up to the transmission inside the pan, for
some reason I remember something was missing in there (seems to be shifting
a little higher than it's supposed to) Just a little bit of debugging now
-
(2/9/98) Messed with the brakes a little bit more,
but no luck yet. I've got some lighter rear springs, but haven't put them
in yet, and I'm going to put a flex fan on at least for now to see if it
will stay cooler. I haven't had much time to spend on the Z-24 lately because
I've been doing a lot of overtime for work.
(5/16/98) ....................Trying to sell it........
(2/7/99) Everything is sold - Working towards getting
a shop of my own to work on my projects, I guess I just got tired of doing
all my work away from my house
(11/22/01) It's
been a while, I guess that shows how you can lose interest in a project,
especially when you don't have the room or tools to work on it in (your own room
or tools, at least in my case), now I've got a new house with a 25' by 20'
garage on the house, and a 30' by 40' garage beside the house, also have a mig,
tig, and a plasma cutter. Got the space and equipment to work on my Z-24,
but no Z-24 to work on, well, that's the way it goes.
I guess that pretty much covers it for now, back to
the Z-24 page
OR
Click on any part of the images below to navigate around my site
to email just put "mail" in front of my domain


Last Modified:
Friday, December 13, 2019 06:52:51 PM